Process:
So my son had a fit and decided to slam the baby gate door so hard that the hinges broke right in half. Not sure where replacement hinges could be bought and needing the baby gate rather quickly I figured I'd use some of the left-over plastic resin I bought after the The Fix That Wasn't to make two new ones.
The process was pretty simple: make the pattern, create the mold then cast the new part except for usually I use my Propane Burner and Home Foundry to make them in aluminum but this time I used the Smooth-On two-component plastic resin.
The whole thing took about an hour and I've had the new hinges installed now for one day and it seems to have done the trick.
Pictures:
The broken hinges
Using crazy glue to temporarily fix them
Filling the cavity with playdo to strengthen cast
Preparing the mold
The alginate I used for making the mold
Universal release agent to make it easier to separate pattern and final cast
This hardens into a white plastic in 10 minutes
Pouring the alginate over the old pattern to make the mold
Letting it set for about 10 minutes
Once the cup was removed
Flipping it over reveals the pattern in the mold
Once I poured the plastic resin into the mold
The hardened resin
The rough casts revealed and the mold in the background
The new casts beside the old hinges. Note the hole is now filled in for the new hinges
After the casts were cleaned up and drilled
Ellie thinks it's the coolest thing ever
The installed baby gate with the new hinges
Close-up of the top hinge
Close-up of the bottom hinge
Tools:
Knife
Spoon
Drill
Sander
Hot glue gun
Materials:
Smooth-on alginate
Smooth-on plastic resin
3 paper cups
Cost:
$0.00
Time:
1hr
Savings:
No idea how much those brackets are
Conclusion:
Looks good. Not sure how strong they are. I guess time will tell
Difficulty Level (Easy, Medium, Hard, Insane):
Medium
Process:
When I originally bought my winter jacket, the zipper was an area of concern because the teeth were very fine. If I had to guess where it would break first that main zipper would have been the place. So just like I predicted, it started acting up on me a while back and I knew I'd have to do something about it.
Now, winter jackets are not that expensive. I think I paid $125 bucks for this one and I really could just go buy a new one but I figured hey, why not trying to fix it. When I found out that a replacement zipper was only $9 bucks I decided to give it a try.
First I had to take the old zipper out, which was a pain in the butt, then sew the new one back in. The only thing that made it a bit tricky is that since it is a winter jacket there are various layers that had to be sewn together at the right spot. Since I don't have a commercial sewing machine and I'm not a seamstress or whatever they're called if they're guys I did one layer at a time.
I almost gave up after one half took me an hour and a half but then I calculated the savings and even if the other side took me another hour and a half, I'd still end up getting over $40/hr in actual savings for my labor so I decided to go for it even though I don't particularly enjoy sewing.
Surprisingly, the second half only took me about half an hour so for 2hrs of work and $9 bucks I have a virtually brand new jacket. Pictures:
Diagram of fabric layers
The faulty (original) zipper
Taking the old zipper out
After one side was done
Close-up of the old and the new zipper
The top of the new zipper after one side was done
The final product; good as new
Tools:
Sewing machine
Sharp knife
Needles
Materials:
Zipper
Cost:
$8.81
Time:
2hrs
Savings:
$126.80
Conclusion:
Everything seems good and the zipper works great.
Process:
Mixing 3g of fine aluminum powder with 24g of manganese (iv) oxide and lighting it on fire with a 4" piece of magnesium ribbon creates a very bright flash and a nice big cloud of smoke. Something I might mix up with the kids at church next science night.
I bought the manganese (iv) oxide and aluminum powder over 20 years ago when I first got into chemistry back in high school so I dug it out and it still works perfect. Maybe I'll try black powder next time...
Videos:
Pictures:
Aluminum powder
Manganese (iv) oxide
Weighing 9g of aluminum powder
Add 24g of manganese (iv) oxide
The magnesium ribbon that just arrived in the mail today
Tools:
None
Materials:
24g of manganese (iv) oxide
9g of aluminum powder
4" of magnesium ribbon
Cost:
$0.10 for the magnesium
Time:
20 minutes
Conclusion:
Awesome! I could totally have gotten into pyrotechnics...
Process:
The process was actually quite easy: Get the wood, trace the template on a piece of plywood (my mother in law actually did that part), cut out the wood then sand the edges (Mel did this part). The only thing was that there was a LOT of cutting out and all the lines were curvy and squiggly. Nothing was straight and therefore the whole thing took pretty much the whole day to do but I do have to say, although I'm not much of a crafty-stuff-liking-guy it turned out quite nice.
Pictures:
This was the second time around. The first one was traced with a template (shown on last picture)
Cutting out the rough shape
Using the jig saw to fine-cut the pattern
Put together minus the two sheep
The finished nativity scene
Another angle
The original pattern
A picture of the final painted version aunt Ida sent me
Another view
Tools:
Pencil
Saw horses
Band saw
Jig saw
Sanding block
Materials:
2 sheets of 1/2 G1S plywood
Template
Tracing paper
Cost:
$85.00
Time:
8 hrs
Savings:
No idea what they would cost to buy
Conclusion:
It looked quite nice but probably one of my less favorite projects
On August 25th I had a major realization that shook up my
world. I recorded it in a note to myself back then as it was way too raw to
share with anyone at that time. So for the last two months I have been
deliberately and purposefully mulling over it and observing how things would
look like a few months down the road.
So here it is, this is me.
Oh, and please spare me the religious BS that some might be
tempted to preach at me; I don't want to hear it. However, if you do have a genuine thought or personal
experience you want to share, by all means please do, but do so privately at
eigenheerc at hot mail dot com.
*************************************************
August 26th, 2013
Yesterday was the day I realized that I had “arrived”. I
looked at my life, my family, my house, my job, my place in society and saw
that I had everything I had ever wanted. I realized that I was everything I
ever wanted to be. And yet, I didn’t feel any different, or any better for that
matter. If anything, I felt a sense of loss as the questions of purpose and
existence relentlessly assaulted my mind.
Here I was, a husband to my beautiful wife, father of two
healthy children, established at my place of work and in my church. Nothing was
lacking, in fact, I was better off than many people I know, better than I
thought I’d ever be: great income, great benefits and a great position at my
church, a wonderful family, amazing in-laws and a house that I could have only
dreamed of 10 years ago.
I opened the Book of Ecclesiastes and read the first two
chapters with utter astonishment because it perfectly echoed my life and the
way I felt about it. I had everything I wanted and yet, it all didn’t matter. I
could go out and buy anything I wanted to if I wanted to but why didn’t I feel
on top of the world like I imagined I would? Why didn’t “arriving” bring the
satisfaction I thought it would bring?
So here I am, asking: What now? Where do I go from here?
What’s my purpose? What’s the reason for my existence? Why should I go on? What
should I do? Who really am I?
I guess that’s the biggest question of them all: Who am I? A
few generations after I’m gone no one will remember me. No one will think of me
or what I’ve accomplished. Is my life really only significant for a few
decades? A hundred years? That seems so pointless, so insignificant.
Sure, we affect the people around us. Sure, I am loved. Sure,
I have an impact in today’s society and on the people I come in contact with.
But what does that matter? It really doesn’t. Or does it? Here I am plugging
away at an 8-4 job, doing what people do: going to work in the morning, coming
home at night, paying bills, going to bed. All of this times 5 then the weekend
and it all gets repeated again from the beginning.
What a stupid, pointless existence. I see people striving
for what I have. I see them sacrifice their health, their friends, their peace,
even their souls to hopefully, some day achieve a level of financial, social,
familial “success” not unlike the one I currently experience. But what for?
Once they get “there”, will they be free? Happy? Satisfied? Fulfilled?
Significant? I doubt it.
So what then is the essence of this life? What is the true
and pure purpose for my existence? I know that I have the hope of eternal life
through Jesus, but how does that change my today? Does it? If not, shouldn’t
it? I don’t know. Or maybe I do. I think it should. Should it?
Process:
The first thing I did was using a little scrubbing brush and some cleaning solution but I soon realized that in order to do all 500 square feet of hopscotch pattern grout it would take forever and I'd probably lose my arm from all the scrubbing so I had to figure out how to make some sort of tile grout cleaner.
The first thought was to use our pressure washer, hooked up to some sort of contraption that would contain the water and then use a shop vac to suck it all up before it soaks the entire floor. I spent about an hour or two tinkering around with it and came up with something that should work (in theory). However, once I started cleaning the floor I realized that the pressure was way too high and it actually started washing out the grout. So, unfortunately, that solution was no good.
Then I though if I could find a brush attachment for my reciprocating saw that might work but of course these attachments don't exist (to my knowledge anyways) so I had to make one.
I took a wire brush with a metal handle and drilled a couple of holes through it, then I fit it over an old saw blade, drilled holes through the blade and used some steel rivets to secure it in place. It worked like a charm.
When I was drilling the holes it took a very long time because the saw blade uses hardened steel so a little trick I tried (and it worked) was heating up the saw blade with my oxy/actylene torch to orange glowing hot and cool it down slowly. Once it was cool, what took a few minutes before literally took 10 seconds and the drill bit cut through the saw blade like butter.
After I installed the blade I sprayed the grout with the cleaner and scrubbed it with my attachment. The whole job still took almost 4 hours, but at least my arm was still useable afterwards.
Happy Birthday, Melanie!!!
Videos:
Pictures:
The attachment for the pressure washer
The side view with the hole for the vacuum cleaner
The attachment I made with an old wire brush and a used saw blade
Project:
Replacing the new (but faulty) shift solenoid for the second time
Difficulty Level (Easy, Medium, Hard, Insane):
Medium
Process:
I finally got a chance to get away with my 6 year old son Nathaniel to visit my parents in Ontario and even though the 17hr drive was somewhat daunting I was looking forward to it as anything.
Everything went great, we left at 2:30am on Saturday morning and got to Quebec around noon. Shortly after though is when it started.
I was cruising along the Trans Canada highway at 115km/hr when all of the sudden the cruise control kicked out. I pulled over at a rest stop a few minutes later because I thought that maybe the cruise control fuse was blown but couldn't find anything wrong there. After a quick break I started driving again but the check engine light came on right away and I noticed that the take-off was a lot slower than usual.
At first I thought that maybe the one-way stator clutch in the torque converter had died but found out later that because of a fault code the computer put the van in a fail-safe mode which disabled gear 1 and 4, the cruise control and put the shifting to maximum pressure.
I continued driving in gears 2 and 3 but it was a royal pain through the stop-and-go traffic of Montreal. We made it to Ottawa around 5pm with a break at the Montreal IKEA. The next day we spent in the Museum of Civilization in Gatineau/Ottawa. Monday morning we left Ottawa bright and early to drive the last 600km to my parent's place in south-western Ontario.
At 8am I called Mr. Transmission in Waterloo to see if I could book an engine code scan once I got there. Once I had the appointment booked I kept on driving towards Waterloo. Once I arrived in Waterloo I explained my situation and asked if I could observe him doing his diagnostics on the transmission. To my surprise he said that he didn't like an audience and told me to come back in half an hour.
When I got back he gave me the dreaded news:
1. The engine code was P0753 - Shift Solenoid A
2. The oil was completely black and burned (which actually wasn't true at all I found out later)
He said that he could do an Ohm-test on the solenoid to find out if that was really the cause of the error code and told me to come back in another 45 minutes
Once I got back he gave me the surprising news (which, again, ended up being completely wrong) that the shift solenoid was GOOD, even though the code said it was faulty.
This didn't make any sense and I asked him how an internal transmission issue could cause a shift solenoid to fail and/or send a shift solenoid trouble code.
He never answered my question but instead insisted that there were some very serious internal transmission issues that demanded a complete $2800 transmission overhaul. He said, and I quote: "Judging by my 25 years of experience you have some severe internal transmission problems. In fact, the gears are probably fused together". He then told me that he could arrange a rental vehicle for me so I could SAFELY get to my parents' place.
I informed him that I had driven the van in this present condition for over 900km and that I was going to take my chances for the next 80.
I ended up driving home to my parents' place and focused on spending some time with my family. My brother and his wife and kids had come to Canada for a visit from Switzerland so I was really excited to spend some time with them.
The next day my two brothers Rudy and Markus and I took the van to a nearby transmission shop and explained the situation. He did a very thorough engine code scan and took us for a test drive on which he explained everything he was doing. Afterwards he hooked up his Ohm meter to the external transmission plug and to my shock and surprise he told me that shift solenoid B (2-3 shift solenoid) was GOOD, but that solenoid A (1-2 shift solenoid) was BAD. He showed me the resistance on his ohm meter: there was a clear difference between solenoid A (1.2Ω) and B (24.5Ω).
So here's a rant about Mr. Transmission, please feel free to skip this part. I was VERY displeased with the high pressure tactics he used to try to convince that the entire transmission was completely shot. It was so bad that I actually ended up submitting an official complaint with the BBB because I felt he was misleading me to believe something was wrong that actually wasn't and that something was NOT wrong when it actually WAS! Unfortunately, this has not been the first negative experience with a Mr. Transmission franchise. Also, the tranny shop where I got my second opinion at said that he used to work for the guy in Waterloo and that "I don't work there anymore; I don't have to work LIKE THAT". He didn't elaborate, but it was clear to me that the bitter taste in my mouth I had gotten after my visit to the shop in Waterloo was not just my emotions getting the better of me.
Anyways, that was my little rant. Back to the van. Once we all concluded that JUST LIKE THE ENGINE CODE said, the problem was most likely the Shift Solenoid A we decided to jack up the car and repeat the procedure which I thoroughly documented in my other blog entitled "Fixing My Van's Transmission". The only difference was that this time I knew what I was doing and I had my brother Rudy and brother in law Jeff help me out. What took me 8hrs the first time took us less than 3hrs the second time.
Once we had the side cover off it was immediately apparent that the issue for the engine code definitely was the shift solenoid; it was completely fried. So the only conclusion I have is that when I put in the original NEW solenoid about a month ago it was one with some manufacturer's fault which showed up on my drive down to Ontario. Bummer that it takes about 10hrs of labor to replace.
The next night my brother and dad helped me put it back together. What took me 6hrs the first time around took only a little over 2hrs the second time.
At midnight we finished most of it up, completely finished the rest in the morning, put new oil in it and took it for a very successful test drive.
After my long-awaited actual vacation I packed up the van and drove the almost 2000km back home to New Brunswick and arrived with absolutely no transmission issues whatsoever.
Although the van is probably completely fixed and would most likely run without any issues for the next 4 or 5 years I'm so sick and tired of that van that I'm gonna get rid of it and buy something newer.
Videos:
In the video I say that the oil has plenty of metal filings. It actually was not metal at all but the clutch material from shifting hard for 900km
The shift solenoid taken apart and explained
Pictures:
The code P0753. Note that it says "Electrical"! Clearly not a fused gear issue!!!
My make-shift engine support bar
The oil certainly didn't look black and burned like Mr. Transmission claimed
There was a noticable deposit of metal dust on the magnet but that was not surprising (and not too bad in my opinion) for almost 1000km of driving with only two gears
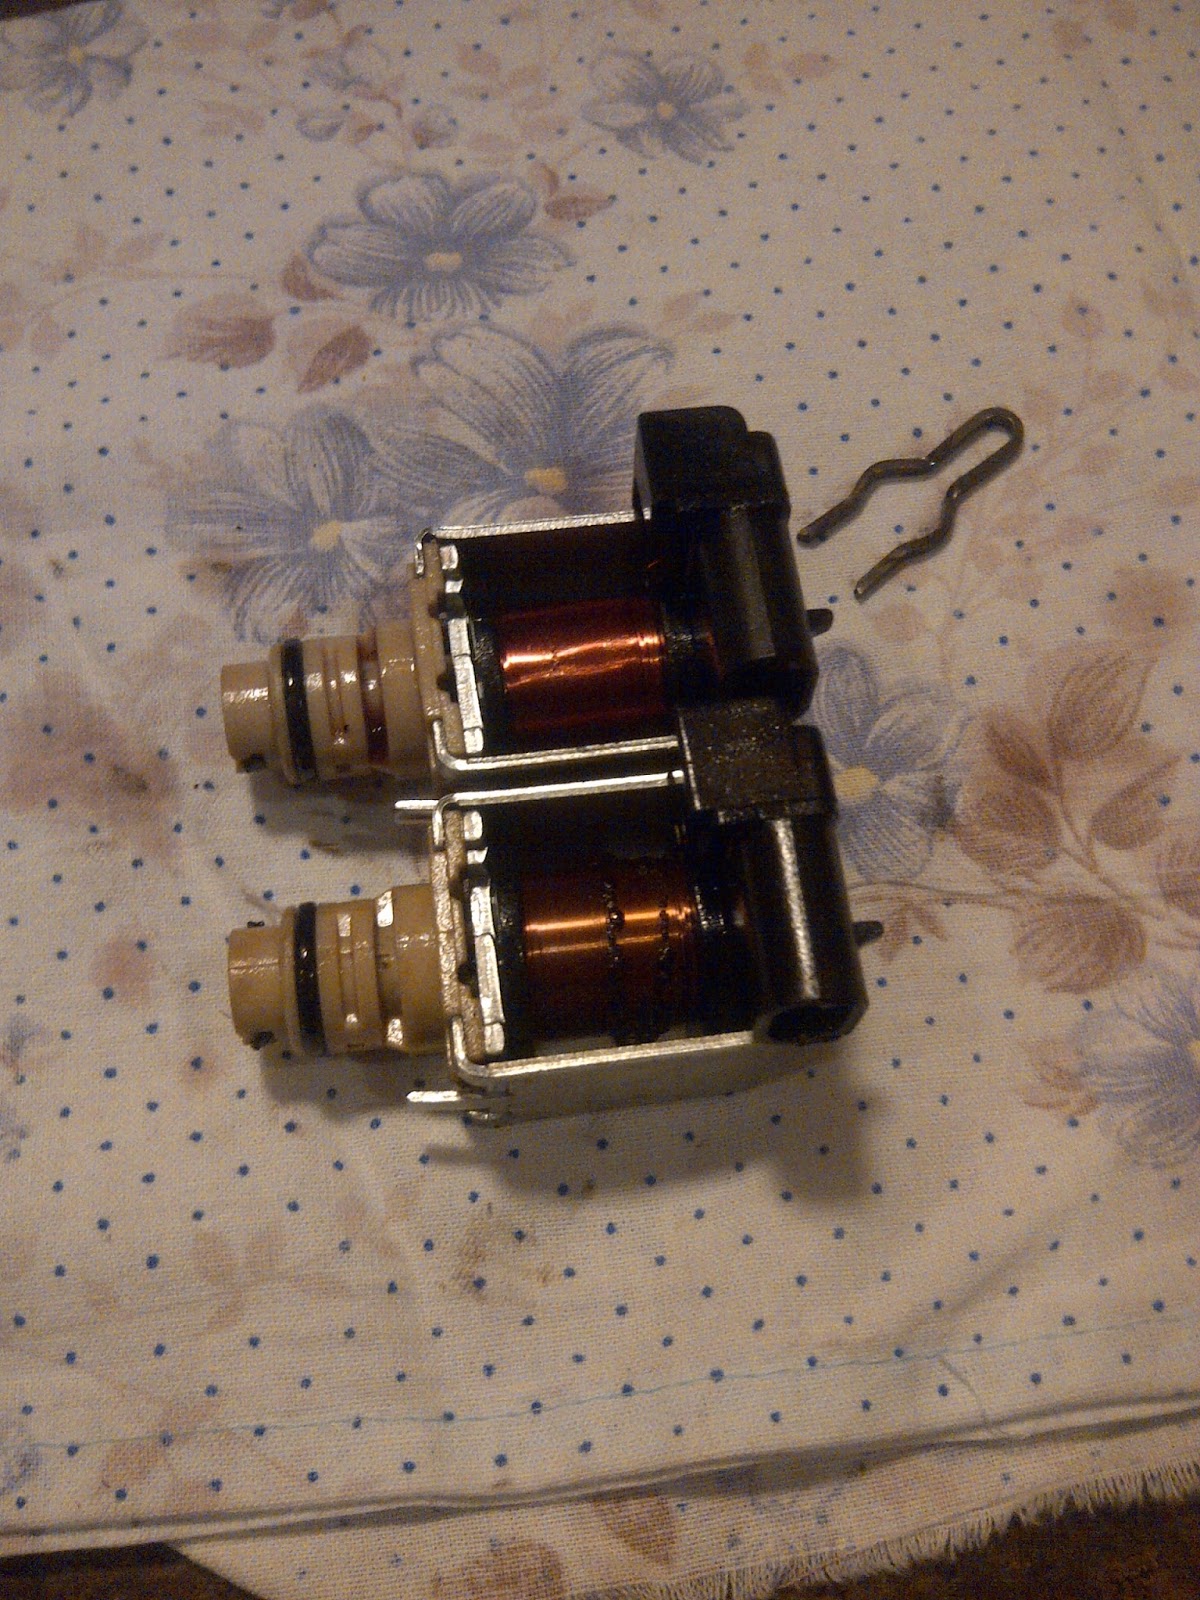
Left: Shift Solenoid A which was bad, the right one was Shift Solenoid B which was good
Notice the difference in color between the top (B) and bottom (A)
Nate inspecting our work the next day
Looks like deja vue all over again! Sadly!
After we stripped the outermost 4 or 5 layers of wire off the burnt solenoid