On August 25th I had a major realization that shook up my
world. I recorded it in a note to myself back then as it was way too raw to
share with anyone at that time. So for the last two months I have been
deliberately and purposefully mulling over it and observing how things would
look like a few months down the road.
So here it is, this is me.
Oh, and please spare me the religious BS that some might be
tempted to preach at me; I don't want to hear it. However, if you do have a genuine thought or personal
experience you want to share, by all means please do, but do so privately at
eigenheerc at hot mail dot com.
*************************************************
August 26th, 2013
Yesterday was the day I realized that I had “arrived”. I
looked at my life, my family, my house, my job, my place in society and saw
that I had everything I had ever wanted. I realized that I was everything I
ever wanted to be. And yet, I didn’t feel any different, or any better for that
matter. If anything, I felt a sense of loss as the questions of purpose and
existence relentlessly assaulted my mind.
Here I was, a husband to my beautiful wife, father of two
healthy children, established at my place of work and in my church. Nothing was
lacking, in fact, I was better off than many people I know, better than I
thought I’d ever be: great income, great benefits and a great position at my
church, a wonderful family, amazing in-laws and a house that I could have only
dreamed of 10 years ago.
I opened the Book of Ecclesiastes and read the first two
chapters with utter astonishment because it perfectly echoed my life and the
way I felt about it. I had everything I wanted and yet, it all didn’t matter. I
could go out and buy anything I wanted to if I wanted to but why didn’t I feel
on top of the world like I imagined I would? Why didn’t “arriving” bring the
satisfaction I thought it would bring?
So here I am, asking: What now? Where do I go from here?
What’s my purpose? What’s the reason for my existence? Why should I go on? What
should I do? Who really am I?
I guess that’s the biggest question of them all: Who am I? A
few generations after I’m gone no one will remember me. No one will think of me
or what I’ve accomplished. Is my life really only significant for a few
decades? A hundred years? That seems so pointless, so insignificant.
Sure, we affect the people around us. Sure, I am loved. Sure,
I have an impact in today’s society and on the people I come in contact with.
But what does that matter? It really doesn’t. Or does it? Here I am plugging
away at an 8-4 job, doing what people do: going to work in the morning, coming
home at night, paying bills, going to bed. All of this times 5 then the weekend
and it all gets repeated again from the beginning.
What a stupid, pointless existence. I see people striving
for what I have. I see them sacrifice their health, their friends, their peace,
even their souls to hopefully, some day achieve a level of financial, social,
familial “success” not unlike the one I currently experience. But what for?
Once they get “there”, will they be free? Happy? Satisfied? Fulfilled?
Significant? I doubt it.
So what then is the essence of this life? What is the true
and pure purpose for my existence? I know that I have the hope of eternal life
through Jesus, but how does that change my today? Does it? If not, shouldn’t
it? I don’t know. Or maybe I do. I think it should. Should it?
Process:
The first thing I did was using a little scrubbing brush and some cleaning solution but I soon realized that in order to do all 500 square feet of hopscotch pattern grout it would take forever and I'd probably lose my arm from all the scrubbing so I had to figure out how to make some sort of tile grout cleaner.
The first thought was to use our pressure washer, hooked up to some sort of contraption that would contain the water and then use a shop vac to suck it all up before it soaks the entire floor. I spent about an hour or two tinkering around with it and came up with something that should work (in theory). However, once I started cleaning the floor I realized that the pressure was way too high and it actually started washing out the grout. So, unfortunately, that solution was no good.
Then I though if I could find a brush attachment for my reciprocating saw that might work but of course these attachments don't exist (to my knowledge anyways) so I had to make one.
I took a wire brush with a metal handle and drilled a couple of holes through it, then I fit it over an old saw blade, drilled holes through the blade and used some steel rivets to secure it in place. It worked like a charm.
When I was drilling the holes it took a very long time because the saw blade uses hardened steel so a little trick I tried (and it worked) was heating up the saw blade with my oxy/actylene torch to orange glowing hot and cool it down slowly. Once it was cool, what took a few minutes before literally took 10 seconds and the drill bit cut through the saw blade like butter.
After I installed the blade I sprayed the grout with the cleaner and scrubbed it with my attachment. The whole job still took almost 4 hours, but at least my arm was still useable afterwards.
Happy Birthday, Melanie!!!
Videos:
Pictures:
The attachment for the pressure washer
The side view with the hole for the vacuum cleaner
The attachment I made with an old wire brush and a used saw blade
Project:
Replacing the new (but faulty) shift solenoid for the second time
Difficulty Level (Easy, Medium, Hard, Insane):
Medium
Process:
I finally got a chance to get away with my 6 year old son Nathaniel to visit my parents in Ontario and even though the 17hr drive was somewhat daunting I was looking forward to it as anything.
Everything went great, we left at 2:30am on Saturday morning and got to Quebec around noon. Shortly after though is when it started.
I was cruising along the Trans Canada highway at 115km/hr when all of the sudden the cruise control kicked out. I pulled over at a rest stop a few minutes later because I thought that maybe the cruise control fuse was blown but couldn't find anything wrong there. After a quick break I started driving again but the check engine light came on right away and I noticed that the take-off was a lot slower than usual.
At first I thought that maybe the one-way stator clutch in the torque converter had died but found out later that because of a fault code the computer put the van in a fail-safe mode which disabled gear 1 and 4, the cruise control and put the shifting to maximum pressure.
I continued driving in gears 2 and 3 but it was a royal pain through the stop-and-go traffic of Montreal. We made it to Ottawa around 5pm with a break at the Montreal IKEA. The next day we spent in the Museum of Civilization in Gatineau/Ottawa. Monday morning we left Ottawa bright and early to drive the last 600km to my parent's place in south-western Ontario.
At 8am I called Mr. Transmission in Waterloo to see if I could book an engine code scan once I got there. Once I had the appointment booked I kept on driving towards Waterloo. Once I arrived in Waterloo I explained my situation and asked if I could observe him doing his diagnostics on the transmission. To my surprise he said that he didn't like an audience and told me to come back in half an hour.
When I got back he gave me the dreaded news:
1. The engine code was P0753 - Shift Solenoid A
2. The oil was completely black and burned (which actually wasn't true at all I found out later)
He said that he could do an Ohm-test on the solenoid to find out if that was really the cause of the error code and told me to come back in another 45 minutes
Once I got back he gave me the surprising news (which, again, ended up being completely wrong) that the shift solenoid was GOOD, even though the code said it was faulty.
This didn't make any sense and I asked him how an internal transmission issue could cause a shift solenoid to fail and/or send a shift solenoid trouble code.
He never answered my question but instead insisted that there were some very serious internal transmission issues that demanded a complete $2800 transmission overhaul. He said, and I quote: "Judging by my 25 years of experience you have some severe internal transmission problems. In fact, the gears are probably fused together". He then told me that he could arrange a rental vehicle for me so I could SAFELY get to my parents' place.
I informed him that I had driven the van in this present condition for over 900km and that I was going to take my chances for the next 80.
I ended up driving home to my parents' place and focused on spending some time with my family. My brother and his wife and kids had come to Canada for a visit from Switzerland so I was really excited to spend some time with them.
The next day my two brothers Rudy and Markus and I took the van to a nearby transmission shop and explained the situation. He did a very thorough engine code scan and took us for a test drive on which he explained everything he was doing. Afterwards he hooked up his Ohm meter to the external transmission plug and to my shock and surprise he told me that shift solenoid B (2-3 shift solenoid) was GOOD, but that solenoid A (1-2 shift solenoid) was BAD. He showed me the resistance on his ohm meter: there was a clear difference between solenoid A (1.2Ω) and B (24.5Ω).
So here's a rant about Mr. Transmission, please feel free to skip this part. I was VERY displeased with the high pressure tactics he used to try to convince that the entire transmission was completely shot. It was so bad that I actually ended up submitting an official complaint with the BBB because I felt he was misleading me to believe something was wrong that actually wasn't and that something was NOT wrong when it actually WAS! Unfortunately, this has not been the first negative experience with a Mr. Transmission franchise. Also, the tranny shop where I got my second opinion at said that he used to work for the guy in Waterloo and that "I don't work there anymore; I don't have to work LIKE THAT". He didn't elaborate, but it was clear to me that the bitter taste in my mouth I had gotten after my visit to the shop in Waterloo was not just my emotions getting the better of me.
Anyways, that was my little rant. Back to the van. Once we all concluded that JUST LIKE THE ENGINE CODE said, the problem was most likely the Shift Solenoid A we decided to jack up the car and repeat the procedure which I thoroughly documented in my other blog entitled "Fixing My Van's Transmission". The only difference was that this time I knew what I was doing and I had my brother Rudy and brother in law Jeff help me out. What took me 8hrs the first time took us less than 3hrs the second time.
Once we had the side cover off it was immediately apparent that the issue for the engine code definitely was the shift solenoid; it was completely fried. So the only conclusion I have is that when I put in the original NEW solenoid about a month ago it was one with some manufacturer's fault which showed up on my drive down to Ontario. Bummer that it takes about 10hrs of labor to replace.
The next night my brother and dad helped me put it back together. What took me 6hrs the first time around took only a little over 2hrs the second time.
At midnight we finished most of it up, completely finished the rest in the morning, put new oil in it and took it for a very successful test drive.
After my long-awaited actual vacation I packed up the van and drove the almost 2000km back home to New Brunswick and arrived with absolutely no transmission issues whatsoever.
Although the van is probably completely fixed and would most likely run without any issues for the next 4 or 5 years I'm so sick and tired of that van that I'm gonna get rid of it and buy something newer.
Videos:
In the video I say that the oil has plenty of metal filings. It actually was not metal at all but the clutch material from shifting hard for 900km
The shift solenoid taken apart and explained
Pictures:
The code P0753. Note that it says "Electrical"! Clearly not a fused gear issue!!!
My make-shift engine support bar
The oil certainly didn't look black and burned like Mr. Transmission claimed
There was a noticable deposit of metal dust on the magnet but that was not surprising (and not too bad in my opinion) for almost 1000km of driving with only two gears
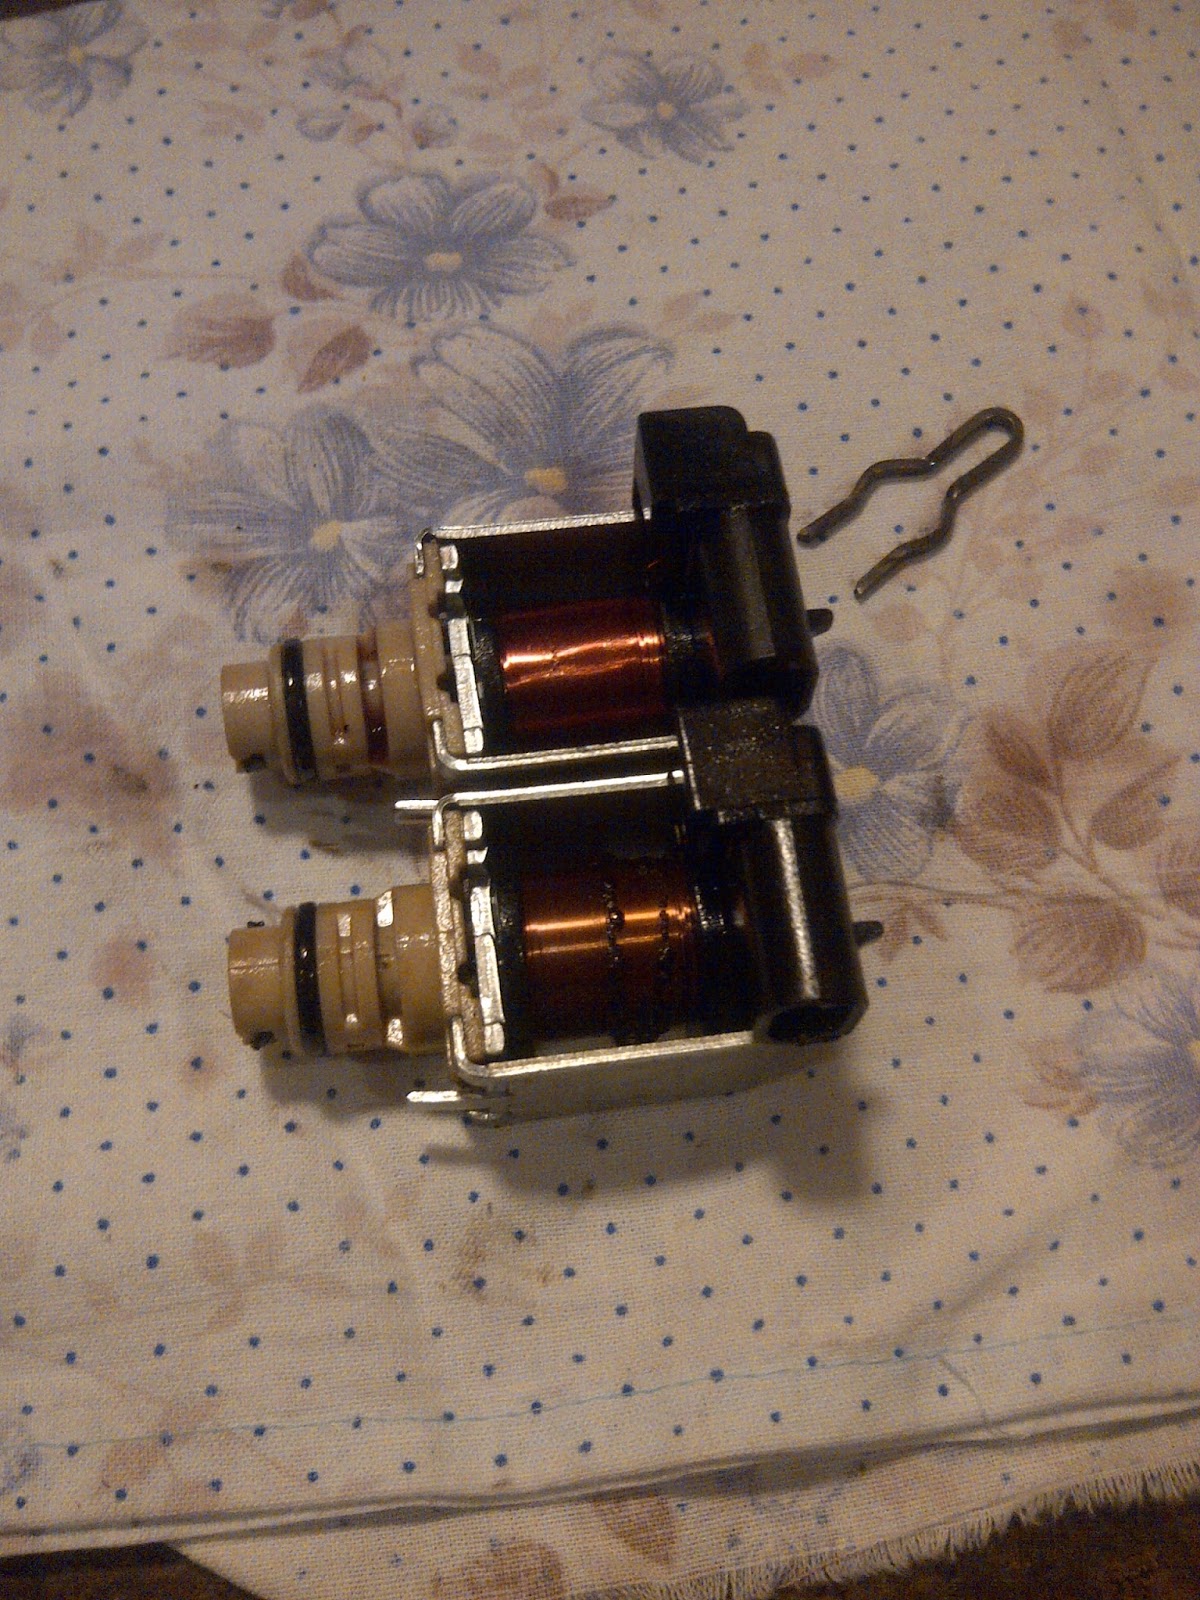
Left: Shift Solenoid A which was bad, the right one was Shift Solenoid B which was good
Notice the difference in color between the top (B) and bottom (A)
Nate inspecting our work the next day
Looks like deja vue all over again! Sadly!
After we stripped the outermost 4 or 5 layers of wire off the burnt solenoid
Process:
Today on my way home from church all of a sudden I started hearing a knocking, snapping, clicking noise coming from the rear of the vehicle. It was very rhythmic and got faster as I accelerated and slower as I slowed down. Interestingly, it went away as soon as I touched the brakes. It seemed to be about once every turn of the wheel so I figured I'd have to do something about that before my 4000km trip to Ontario and back.
I had Melanie drive it on our street while I walked beside the left, then the right and I determined it was definitely the right.
The sound could best be described by an older bycicle that had the main bearings go. It was some sort of a creaking, popping sound and it only happened once per revolution. I figured it would either be the brakes or the wheel bearing.
After jacking it up and spinning the wheel I could tell that it was the rear wheel bearing and I was NOT impressed to say the least. This van was a gift given by one of the most generous people I know (Mel's dad) and I know that he intended it to be a blessing which, unfortunately, it ended up being a crap-load of work. I do have to say, that the thought of him giving us a vehicle to sell and pay for home schooling curriculum was/is incredibly special and dear to my heart so I don't mean this rant to be taking away from his heart of gold, but from a purely time-wise and financial perspective I should have sold the van as is and kept driving our own van.
So far, what I had to do on this 2005 Pontiac Montana (Base), 3.4L since we got it in May is the following:
Fix instrument cluster ($25, 2hrs, saved $800)
Fix door alignment ($0, 1.5hrs, saved $80)
Fix left rocker panel ($150, 15hrs, saved $750)
Patch right rocker panel ($0, 1hr)
Replace muffler and gaskets ($120, 3.5hrs, saved $95)
Replace front left wheel bearing ($150, 1hr, saved $95)
Replace sway bar bushings ($20, 2hrs, saved $75)
Replace transmission solenoids, oil and filter ($250, 14hrs, saved $1000)
Install tranny oil cooler ($60, 3hrs, saved $95)
Replace spark plugs and wires ($100, 3hrs, saved $95)
Replace front brakes ($30, 1.5hrs, saved $95)
Fix leaky radiator ($15, 1hr)
Change oil and filter ($20, 1hr, saved $25)
Wheel alignment ($0, 1.5hrs, saved $95)
Replace rear right wheel bearing ($120, 2hrs, saved $145) Total: $1060 and over 53hrs, saved almost $3500 in labor!!!
Pictures:
Taking out the retaining bolt. This was actually engineered with some brains
Separating the wheel bearing from the back plate
After the wheel bearing was removed; you can see the ABS plug in the center
The old wheel bearing
The new one Melanie picked up for me while she was out
10 minutes later, the new one was installed
Putting the drum back on
And for fun I took the old one apart to see how it worked and I got me some more steel balls out of it
I've had my DeLonghi EAM 4500 cappuccino maker for almost 6 years now and put between 10,000 and 20,000 cups of coffee on it so it has served us well. But, it also cost an arm and a leg ($900 used on ebay) back in 2008. So needless to say, I didn't really want to give it up that quickly and buy another one since that would have probably been outside our budget. The only option then, was to try to fix it.
The issues I've had so far with this machine over the last 6 years were as follow:
1. Leak in the top boiler (Leak Fix)
2. Broken thermal cut-off switch (no blog)
3. Broken water hose connector (Connector Fix)
4. Generic alarm
5. Water pump
#1 was a pain in the butt, but it was simply a mechanical issue so after I figured out how to make a proper gasket it was all sunshine, rainbows and cappuccinos
#2 was a simple order and replace fix that cost me about $30 bucks a few years back
#3 was definitely the easiest one
#4 was a royal PIT@!!! This, and #5, is what this blog is about
Shortly after I fixed #3 above, the machine started acting up and giving the intermittent "Generic Alarm" which was quite dreaded on the DeLonghi forums. The solutions ranged anywhere from broken motors, broken pumps, broken sensors, broken boiler units all the way to a broken triac on the main electronic power board.
When I plugged in the machine it said "Heating up please wait..." for quite a long time and then it switched to "Generic Alarm".
Somehow I deduced that it had to do with the heating of the boiler units of which there are two: one on top which does the main hot water for brewing the coffee and a second one in the back which comes after the first one and is used to create steam for the cappuccino attachment.
There could be three possible problems:
#1 one of the two temperature sensors (one on each boiler)
#2 one of the two heating elements
#3 the main power board (I have a used main power board I'd sell for $100 CAD; they're $200 new)
I found a great Parts Replacement Resource Website so I figured that the chances are fairly small for both temperature sensors to go at the same time so I ordered one replacement sensor which came to about $30 bucks with shipping.
Two weeks later I got the part, replaced it, turned it on and IT WORKED!!! Except for, it only worked for about two days! So that was no good.
Then I measured the heating elements and they registered at 14.2Ω and 14.8Ω respectively. Using Ohm's laws, and knowing that the heating element were both rated at 1000W, the voltage was measured at 123V, the amps I was drawing through the heating process should be:
I=P/V I=1000W/123V I= 8.13A I measured the amperage and it was 8.2A so that was good. Then I calculated the resistance which should be: R=V/I R=123V/8.2A R=15Ω
So that was pretty good too, so I knew that the heating elements were working fine. The only logical conclusion (and this was the painfully expensive realization) was that the main power board was fried. I took it off, had a real good look at it but it didn't look burnt or anything so I put it all back together and IT WORKED!!! Except for, it only worked for about a day or so! So, I had to bite the bullet and ordered the $200 replacement power board. Crazy to think that I'd pay more for a replacement part of a cappuccino maker than most people pay for their entire coffee machine, but the only other alternative was either a $10 cheapo walmart coffee maker that makes nothing but slop, a $100 kuerig for which the k-cups are ridiculously expensive (and I refuse to pay 80 cents for a cup of coffee at home) or another real machine for another $1000-$1500. Needless to say, my tenacity (or stubbornness as Melanie calls it) took over and I ordered the replacement board (of course with Melanie's agreement, she missed a decent cup of coffee, too!!!). About two weeks later I got it, put it in and whoohoo, IT WORKED!!! Except for, it only worked for two days. I was NOT a very happy man, that's for sure. Melanie was getting annoyed by this time so I didn't get any sympathy from her either and I still didn't have a fix. I think what was bothering me more than anything is that IT DIDN'T MAKE ANY SENSE. Sometimes it would work and sometimes it wouldn't. I tested and/or replaced every possible scenario and it was so inconsistently not working that I was at my wit's end. I just could not for the life of me figure out what could possibly cause these malfunctions! Frustrating!!! The last glimmer of hope I got when I remembered something I read about the water pump possibly causing the "Generic Alarm" but since (for the most part) the water came out fine I dismissed that possible cause until the power board replacement didn't fix it. So, last week I ordered a new water pump (another $50, but the pump was on its way out anyways) and said to myself that if that didn't fix the machine I would take a sledge hammer to it and cut my losses and go back to drinking slop. Last night I plugged it in again just because I couldn't let it go and luckily it worked for a couple of cups but then stopped working again. Out came the volt meter (AGAIN!) and I just happened to notice that there was a little spark inside of the thermal cut-off switch (TCO) on the back boiler. Interestingly I had tested that switch many times before and it always showed continuity (which it's supposed to have), but I never tested the continuity throughout the entire warm-up cycle. As a desperate last measure (before getting the new water pump) I by-passed the thermal switch in the back and wouldn't you know it: it never gave me the "Generic Alarm" again. Today UPS delivered the replacement pump, I put it in, found another thermal fuse that I had lying around, rigged it up and put it all back together. This may actually have been the problem all along: The thermal cut-off switch would allow power through it until the back boiler heated up just almost exactly to the temperature it would have to be for the computer to register the OK, but then the TCO would open, the power would get interrupted and the heating element would cool down again until it was cold enough for the switch to close again. And so it would go, a continuous cycle of heating, opening the TCO, cooling, closing the TCO and heating it up again until the computer said something's wrong and threw the "Generic Alarm". I guess I'll find out in the next few days, but the sledge hammer definitely IS still a possibility!!!
In summary, I paid:
$900 for the cappuccino maker in 2008
$30 for the thermal cut-off switch (TCO) in 2009
$5 for the gasket material for the top boiler in 2012
$30 for a replacement temperature sensor in 2013
$200 for a replacement power board in 2013
$50 for a replacement pump in 2013
Total: $1215
Which works out to be only about 8 cents/cup over the years plus the actual coffee grinds. This is still a saving of $21,285.00 over going to Tim's (I guess I have to justify it somehow)!!!
Videos:
Pictures:
Power board close up of the two triacs and the heat sink
Power board that didn't end up having to be replaced after all. Anybody want a $200 power board?
Inside of the water pump
The housing of the water pump
The worn-out components of the old water pump
Another view of the water pump housing
The TCO that ended up being the cause of all my troubles
Tools:
Screwdriver
Pliers
Materials:
Salvaged thermal cut-off switch
Main control/power board
Water pump
Cost:
$250
Time:
30 - 40 hrs...WAY too much for my liking
Savings:
$21,285.00
Conclusion:
Lord have mercy on me! Let this be the last time I have to fix this oh so hated and at the same time so wonderfully loved machine!!!
Additional Note:
I've had some requests to write down the steps on how to get into diagnostics mode. There are actually two different modes. Here are the details: 1. To get into Regular Test
Mode: press "one shot" plus "long shot" while plugging
in the machine 2. To get into Display Module Test Mode: press "two shot" plus "long
shot" while plugging in the machine 3. To get into the Coffee Count Screen, hold the "menu" and "change" button while plugging in the machine
in
display module test mode, each button will display "button 1", "button
2" etc to test the buttons
Difficulty Level (Easy, Medium, Hard, Insane):
Medium
Process:
Back in May I had to fix the holes in the rocker panels on our van to pass inspection. At first sight I thought I could just patch up two or three small areas but upon further inspection I realized that the whole left rocker panel was pretty much shot and instead of spending two nights to fix half of it and then another two nights fixing it again in a year or so I figured I might as well replace the whole thing from front to back.
The process was pretty simple: remove the old rusted panel, weld the new one back in, body-fill it, sand, primer and paint it. And that's all she wrote but I have to say that fixing those bloody things is an UGLY, DIRTY, LOUD job. Not something I would do for fun!
About the right hand side: It was actually pretty good except for a couple of small holes. I just patched those up with some body filler and painted over top of it. That patch job will do for the next 2-3 years... Pictures:
A small hole but not much around it holding up the hole
Those "specialists" at the shop jacked up the van by the rocker panels and bent the snot out of them so I had to straighten that mess out again...ughh...
After the rusty rocker panel was removed. What a dirty, ugly job that was!
The bent rocker panel straightened out again with my hydraulic body kit from princess auto
I welded a 1" x 1/8" piece of flat steel in to strengthen it and give me a good surface to weld the new rocker panel to
The new rocker panel spot welded at the bottom
And then welded at the top
Looking straight down, the back of the rocker panel by the wheel well; that was completely rusted off
After it was patched with some heavy duty tar
Body filler ready for sanding
Another view
Sanded and ready for primer
After it was primered
Then I gave it 3 nice coats of dark bronze metallic paint
Good as new, actually, it's probably better than new
Tools:
Angle grinder
MIG welder
Jack
Impact wrench
Screwdrivers
Socket set
Hammer
Body filler rasp
Sandpaper
Project:
Install an external transmission oil cooler
Difficulty Level (Easy, Medium, Hard, Insane):
Medium
Process:
When the van transmission started shifting hard and giving me the P1811 code (particularly when the engine warmed up) I knew I'd have to replace the EPC solenoid which I did later (Tranny Fix) but until all the parts got here I wanted to install a tranny oil cooler to alleviate the symptoms.
It ended up working out quite well because the oil line was close to being rusted through so that would have become an issue sooner or later.
The process was pretty simple: Finding the tranny oil return line, cut it, connect one of the external oil cooler lines to one side and the other line to the one that went back to the transmission.
Pictures:
The $4000 scan tool at Mr. Transmission showing the P1811 code
The rusted line after I took it off and cut it
The $60 oil cooler on my work bench
The return line that goes back into the tranny has been removed
The cooler mounted in front of the radiator
Using the double/bubble flare tool to put a little lip into the oil line so the rubber hose won't slip off
The piece that goes from the main radiator to the external oil cooler
This picture shows the rubber hose coming from the external oil cooler connected to the steel line that goes back to the transmission
The oil line connected to the transmission again
Tools:
Pipe cutter
Double/bubble flare kit
Side cutters
Wrenches
Screwdriver
Materials:
Tranny oil cooler
Cost:
$60.00
Time:
3hr
Savings:
Not sure how much they would have charged me to install, but I'm guessing $130 bucks or so
Conclusion:
It definitely helped in keeping the oil temperature down and prevented the hard shifts 90% of the time.