To build a sandblasting cabinet that can be folded back into a work bench for storage
Difficulty Level (Easy, Medium, Hard, Insane):
Hard
Process:
Melanie finally booted me out of the house and told me to go have some fun in the shop so I decided that I was going to start the huge restoration project of my 1949 Ducati Cucciolo. I took it out, put it on the bench and envisioned taking it apart when I realized that as soon as I started, I'd have to be able to blast the parts. So I decided that I better build that blasting cabinet I've been putting off for over a year now (I bought a sand blaster in November 2011 when we were down in the states but I never really had the chance to use it because of the mess it would have created).
Whereas sandblasting cabinets are easy to find and are fairly reasonable, I'd have to get one large enough to do my tires and fenders so it would cost at least $400 bucks at princess auto. Whereas the price would be somewhat justifiable, I would have just absolutely no place to store it for the rest of the 364 days I wouldn't use it in the year so I figured if I could custom build one that collapses back into my workbench I could have the cake and eat it too.
Pictures:
 |
| After I had unscrewed the 3/4" sheet of OSB which was/is my bench surfase |
 |
| Cutting the 2x8 boards |
 |
| After I built the collection box underneath |
 |
| The vacuum hose that will eliminate the dust |
 |
| Supporting the base with some 1"x1"x1/8" angle iron |
 |
| Using my ramset tool I shot some anchors into the frame of the work bench to hold the vertical piece of the cabinet |
 |
| The sides are folded down, the back (and rear half of the top) are folded up |
 |
| After installing a 24" fluorescent light |
 |
| I had to do some math to calculate the front, the angle and the front half of the top so they'd add up to 30" so that when I fold it all down it would be the same as the depth of the work bench |
 |
| After the hinges were installed and the basic frame was put up |
 |
| Cutting out the area for the looking port and for where the arms go in |
 |
| I stapled the sand blasting gloves to a larger piece that will go in the front while the cabinet is assembled |
 |
| It's coming together. The gloves are in. |
 |
| Finished! Now, on to trying it out on something |
 |
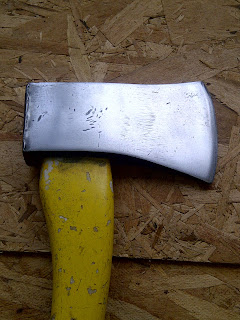
| A dull, old, rusty ax I had lying around |
 |
| After it was blasted. This only took about 2 or 3 minutes and two cups of blasting media |
 |
| A couple of minutes of sanding it with an orbital sander and it's as good as new |
Tools:
Table saw
Air nailer
Hole saw
Cordless drill
Drill bits
Angle grinder
Bench top grinder
Drill press
Tap & die set
Mig welder
Ramset tool
Jig saw
Router
Materials:
One sheet of 3/4" OSB
Two 6ft. piano hinges
One piece of 3/8" plexi glass, 12" x 24"
One pair of sandblasting gloves
18" of 3/16" steel rod
Diamond shaped steel mesh (8" by 12ft.)
9 ft of 1"x1"x1/8" angle iron
1/2 sheet of 5/8" plywood
Screws
Ramset nails
One 24" fluorescent lamp
Cost:
OSB: Free, had some left over
Piano hinges: $14 at the home depot
Plexi glass: free, had some from a yard sale
Gloves: $12 at princess auto
Steel rod: free, had some in my metal bin
Steel mesh: $7 at tri-province
Angle iron: free, had some in my metal bin
Plywood: free, had some left over
Screws: $4 at the home depot
Ramset nails: free, had some left over
Lamp: $12 at the home depot
TOTAL: $49.00
Time:
25hr
Savings:
$350.00
Conclusion:
Love it. Now I can finally start restoring my cucciolo!


7 comments:
goodness. how can 2 ppl be any more different than us???? i love you and your crazy projects!
great job!
can't wait to ride the cucciolo!
It does not surprise me after the lathe. Very nice work, now you can start on the tooling end. Very impressive.
Hey, thanks for this superb DIY project!
Hi' How about giving the measurement in inches or metric so us laymen can understand.
Great DIY project. Going to make this for my dremel and sanding area to keep the sawdust contained. I'll tweak it a bit for what I need but otherwise, awesome!
Hi Chris
I like the idea, but how long does the OSB last?
Gary
@Gary, it's been holding up perfectly, but I don't use it very often.
Post a Comment