Friday, February 12, 2016

Changing Spark Plugs on my 2011 Dodge Grand Caravan

Project:
Changing one spark plug on my van (will do the other 5 some other time)

Difficulty Level (Easy, Medium, Hard, Insane):
Medium

Process:
A couple of weeks ago I started getting a check engine light on my 2011 Dodge Grand Caravan. After I scanned it I got a "P302 - Cylinder #2 Misfire". I was just going to ignore it but then I noticed that my fuel consumption went up from about 14L/100km to almost 17L/100km so I figured I'd better have a look at it.

After some research I learned that the P302 could range anywhere from a bad spark plug to fuel injectors having to be replaced. Before I decided to go out and spend another night in the shop working on my van I'd call the dealership to get a price. I couldn't believe it! They wanted over $300 bucks to replace 6 lousy spark plugs. To add further shock to my system, they wanted $22 bucks PER spark plug. Luckily I found some nice Iridium plugs at Napa for $15 bucks.

At first I was going to replace all 6 of them (which really, I should have) but decided just to try the one and see if it would make a difference. I am glad to say that it really just was the spark plug that caused the check engine light and replacing the #2 cylinder plug fixed the issue.

Whenever I get a new vehicle, the first thing I do is get a Haynes manual for that particular vehicle because taking paying $20 bucks once per vehicle is a lot cheaper than having to replace parts that broke during dis-assembly because I didn't know how to take it apart.

The job seemed daunting at first because I had never done it on this vehicle, but now that I've actually done it, I could probably do all 6 spark plugs in about an hour's time.

The steps were something like this:

1. Take off the air filter & housing (4 clamps)
2. Take off the engine cover (snaps right off)
3. Take off the resonator (snaps right off)
4. Unplug the electrical plugs (3 or 4)
5. Unhook various hoses (3 or 4)
6. Remove the upper intake manifold retaining bracket bolts (1 bolt, 2 nuts)
7. Remove the upper intake manifold front nuts (2 of them)
8. Loosen the upper intake manifold center bolts (7 of them)
9. Remove the upper intake manifold
10. Remove the ignition coil plug
11. Remove the ignition coil bolt
12. Remove the spark plug

Installation is reverse of removal

Update:
Unfortunately, the check engine light came back on a couple of days later with the same P302 code. After some more research I found out that apparently there was a very well known "#2 cylinder misfire" issue with thousands of dodge vehicles affected. It looks like the cylinder heads for some 2011 models (3.6L pentastar engine) had a design flaw which results in cracked cylinder heads and P302 errors.

I brought it to the dodge dealership to have it verified and they confirmed that this was the case with my van. It is currently in the shop where they're replacing the cylinder head (under warranty).

I'm so glad that dodge extended their warranty to 139,000km or to the year 2021 whichever comes first. Saved me a LOT of work there. I asked the service guy what this would have cost me IF it wasn't under warranty and he said about $1200 in labor plus about $800 in parts...Easiest $2,000 I didn't have to spend ever!

Pictures:
Right at the beginning before starting
The cover is off
After removing the upper intake manifold (7 bolts)
Another view (you can see the 3 front ignition coils - #2, #4 and #6 from L to R)
Covering the holes with a clean rag
After the #2 and #6 ignition coils were removed
Comparing the old with the new spark plug
Close-up of the new spark plug
Close-up of the old spark plug
The engine as it was Friday night in the dodge dealership
The service "bill" of $0 (no charge - n/c)
Tools:
Socket set
Screwdriver
Wrench set
Channel lock pliers
Work light

Materials:
1 spark plug

Cost:
$15.00

Time:
2hrs

Savings:
$285.00

Conclusion:
Worked like a charm

Friday, February 5, 2016

Decorative Wardrobe Knobs

Project:
Making a few replacement knobs for my parents' 1926 solid wood wardrobe

Difficulty Level (Easy, Medium, Hard, Insane):
Easy

Process:
My parents came for a visit and because they know that I like to work with metal they asked me whether they could get me to make them a few knobs for their wardrobe's door hinges.

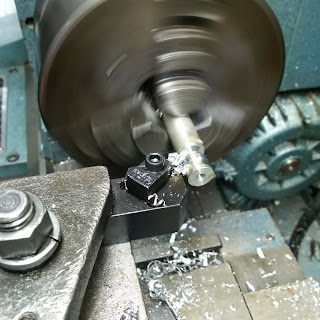
Although I had never done curved profile parts, it ended up being pretty easy to do. All I had to do was grind a 5/16" square HSS tool bit to match the original knob and then do the following steps 5 times:

1. Face the 1/2" piece of aluminum
2. Turn it down to .0406" diameter
3. Chamfer the edges
4. Drill with 1/8" drill bit to 0.375" depth
5. Tap the hole using an M4 by 0.7 tap
6. Use the ground form tool to cut the center grove at 0.160"
7. Use the ground form tool to cut the end curve at 0.460"
8. Part it off
9. Finish sand the end on the belt sander

By the time I was at the last piece (they needed 5 parts) I was able to crank out one part in about 7 minutes and they turned out really nice.

Pictures:
The original hinge pin with two original end caps
The thread was measured at an M4 by 0.7 metric thread
The 5/16" HSS tool blank with the radius marked
Close-up of the marked HSS tool bit
Marking the lines for the center groove and the end radius
My parents thought I should get in the picture too
Dad trying out the lathe with mom watching 
Turning the curved profile into one of the parts
Tapping the hole
A view of the curved profile
The finished parts with one of the original ones (very left)
One new and one old knob mounted on the hinge pin
Another view of the finished parts
Yet another view of the finished parts
Close-up of one of the new pieces
Two knobs on one door hinge pin
Another view of the door
Almost 100 years old
Zoomed out a little bit
The wardrobe in it's 90 year old glory
Tools:
Lathe & accessories
Tap & die set
1/8" drill bit
Bench top belt sander

Materials:
3" of 1/2" diameter round solid aluminum

Cost:
$0.00

Time:
1hr

Savings:
No idea. Probably at least $100 if they had to get a machine shop to do it for them.

Conclusion:
I had fun doing it and my parents are happy with the results

Monday, February 1, 2016

Spindle Lock For My Emco Maximat V10 Metal Lathe - Permanent Solution

Project:
Creating a spindle lock for my metal lathe

Difficulty Level (Easy, Medium, Hard, Insane):
Medium

Process:
The last thing I had to do to finish the Worm And Worm Gear For My Metal Band Saw was to cut a 3/16" key way into my brass gear. In order for me to do that I had to have a reliable way of locking my spindle. Unfortunately, when this lathe was designed in the 70's they did not provide such a mechanism. A few months ago I slapped together a quick and dirty Spindle Lock For My Emco Maximat V10 Metal Lathe. However, although it prevented the spindle from turning, it didn't lock it into one place.

I wanted to come up with a design that would work, was easy to use and didn't look ugly without having to modify the lathe itself too much.

WARNING: If you're a purist, please stop reading this because you will weep and wail at my audacity to drill and tap holes into this beautiful piece of machinery!!!

After cutting down and milling a piece of 1" by 2" by 6" aluminum, I used a fly cutter to cut out a 3" diameter arc, drilled two holes into the piece of aluminum, clamped it to the head stock underneath the cover, then drilled and tapped two holes right into the head stock.

What I didn't do for the first hole (which I should have) was to remove the gear selector rod. I nicked the rod a bit with my drill bit and after I realized it I removed the electrical panel, un-clipped the c-clip, loosened the set screws that held the selector forks and pulled it out.

WARNING! The little o-rings were so brittle and hard that at first I wasn't able to pull out the rod. I started using a through punch and a hammer but right away I thought I'd better check why it wasn't coming out. I'm glad I checked because the brittle o-rings would have locked the selector fork and the hammering would have definitely broken off the little fork so I'm glad I went easy.

I ended up breaking the o-rings with a little dental tool and after they were removed, the gear selector rod pulled right out.

Once I screwed the aluminum piece into the head stock, I took a 4" by 4" of 1/2" hot rolled steel plate, used the fly-cutter to clean it up, measured and aligned it, then drilled and bored it to 30 thou over size. In retrospect, I should have only made it about 5-10 thou larger but I just had to do a little more clamping with my clamping bolt afterwards.

Once the square plate had a big enough hole to go over the spindle, I drilled, tapped and screwed it into the previously installed piece of aluminum, then took it off again and drilled and tapped the hole for the locking bolt.

After turning a piece of cold rolled steel to size, threaded one end and used my Dividing Head to cut a 13mm hex head into it, all I had to do was drill a 15mm hole into the top of the change gear cover, install the locking bolt and I was good to go!

Videos:


Pictures:
The spindle with my first version of the spindle lock
Tracing out the arcs to cut out with the fly cutter
A closer look at the arcs I had to fly-cut out of this piece
Setting it up vertically at first but I switched it horizontally later
Horizontally mounted the piece so I could use the automatic feed to do the fly cutting
The piece after the fly-cutting was done
Drilling and tapping the second hole into the head stock
Cutting a 4" by 4" piece out of this 1/2" hot rolled steel plate
Fly cutting the hot 1/2" plate to clean it up a bit
Getting ready to drill and bore the hole where the spindle will go
Drilling a 7/8" hole into the 1/2" plate
After the piece was drilled, bored and cleaned up
Drilling the clamping screw into the locking plate
The first bolt installed and testing the locking mechanism
Another view
The second bolt installed and a 4 thou brass ship at the top of the spindle
getting ready to turn the locking bolt down to size
After the hex head was cut on the mill with my dividing head
The finished locking bolt
Another view
The installed locking bolt with the cover opened
Another view
Drilling a hole into the cover
The protruding locking bolt
Close up of the locking bolt
Another view
Tools:
Metal lathe & accessories
Tap & die set
Drill press
Angle grinder
Chop saw
Socket wrench set
Metal scribe
Metal square
Dividing head
Angle grinder
Cordless drill
Dental tools
Hammer
Alan keys
Pliers
Clamps
Digital calipers

Materials:
Layout fluid
4 small o-rings
4" of 5/8" cold rolled steel
6" of 2" by 2" aluminum
4" by 4" of 1/2" hot rolled steel plate
4 bolts

Cost:
$10.00

Time:
5-10 hrs

Savings:
Not sure. Probably a couple hundred bucks if I had to pay someone to do it for me

Conclusion:
It works awesome and looks pretty good if I may say so myself

Followers